크롬 익스텐션을 업데이트해보자 feat 네이버 웹툰 북마크
발단

일단.. 간단하게 말하자면.. 1년 넘게 만들고 잘 쓰고 있던 익스텐션이 작동을 하지 않기 시작했다.
아니 뭐 이런 ..
여하튼 고치는 건 고치는 것 이번에는 그냥 쌩으로 다시 다 만들어보기로한다.
크롬 익스텐션에 대한 이해
일단.. 다시 이해하는 것 부터 시작해야한다.
과거에 익스텐션을 만들어 보았다라고는 하지만.. 이번에는 manifest v3에 맞춰 만들어야하고 ..
무엇보다 CRXJS의 유지보수가 되질 않고있다.
여하튼 그러한 의미로 잠시 이해를 하고 넘어가보자
크롬 익스텐션의 구조
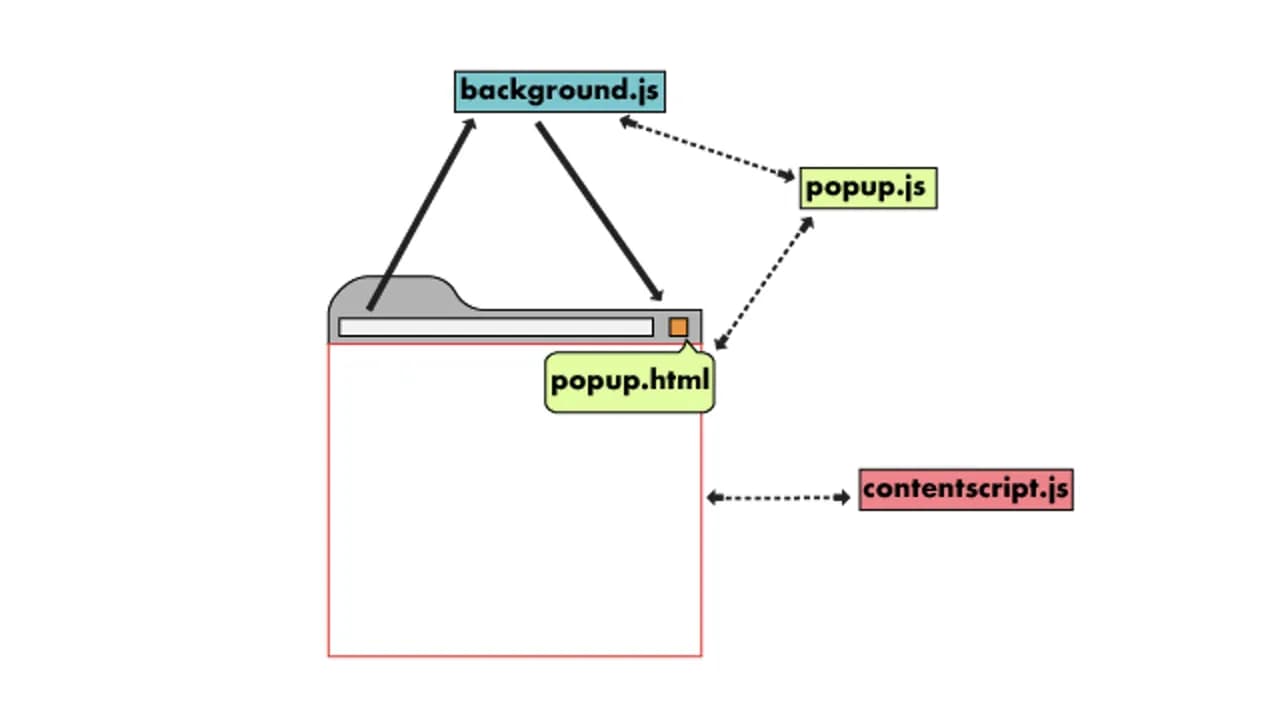
단 한 장으로 이해할 수 있는 아무 좋은 사진이다.
이거 한 장이면 크롬익스텐션을 다 뗐다고 생각하면 된다.
background
그냥 간단하게 말하면 프론트의 백엔드라 생각하면 된다.
실제로 여기서 비즈니스 로직을 돌린다고 생각하면 된다.
fetching이 일어나는 로직이 여기 들어간다 생각하면 된다.
또한 탭 당 하나가 도는게 아니라 크롬 브라우저당 하나 돈다고 생각하면 된다.
탭 당 하나씩 로직을 넣고싶다고 ?? 그럼 다음인 content-script를 사용하면 된다.
하지만 이번에는 이 친구도 쓰지 않는다.
content script
우리가 가장 많이 건드릴 실제 DOM을 조작할 수 있는 영역이다.
그리고 로직들도 여기 포함될 수 있다. 보통 자주쓰이는 chrome.storage등의 로직 등 ..
popup
실제 VIEW에 해당하는 부분이라 생각하면 된다.
우리가 익스텐션을 누르면 나오는 무언가의 팝업창. 그거라 생각하면 아주 간단하다.
options
추가적으로 options라는 것이 있다.
단순히 그냥 크롬 익스텐션 우측 클릭 후 나오는 옵션페이지다.
여기서 또 여러가지 백그라운드와 혹은 여러 저장된 값들과 통신하면 좋을 것 같다.
하지만 이번에는 이 친구도 쓰지 않는다.
환경 설정
이번에는 bun을 사용해서 환경 설정해보려한다.
실제로 bun을 사용해서 개발 할 때 생각보다 빠른 그 속도에 매료되었고 ..
다른 의미로는 그냥 로고도 귀여우니 이번에는 bun을 사용해보자
이번에는 아래의 레포지토리의 도움을 많이 받았다.
https://github.com/luqmanoop/bun-chrome-extension
저 레포지토리를 참조해서 정확히 5개 작성 할 것이다. 하나씩 풀어보자.
cwd
import { $ } from 'bun'
import { resolve } from 'node:path'
console.log(resolve(__dirname, '../'))
$.cwd(resolve(__dirname, '../'))
별거 없다. 실행하면 현재 커맨드라인의 위치를 프로젝트 폴더의 root로가게끔 하는 로직이다
현재 빌드 관련파일들은 싸그리 다 confg/ 아래에 있으므로 이런식으로 hook만들 듯이 파일을 작성한다.
build.ts
import Bun, { $, Glob } from 'bun'
import manifest from '../public/manifest.json'
import './cwd'
const outdir = './build'
const { content_scripts } = manifest
const scripts = content_scripts.flatMap((script) => script.js)
const publicFolder = './public'
const resolveEntryPoints = (entrypoints: string[]) => entrypoints.map((entrypoint) => ``./src/${entrypoint}``)
await $``rm -rf ${outdir}``
const ext = {
html: '.html',
png: '.png',
css: '.css',
}
await Bun.build({
target: 'browser',
entrypoints: resolveEntryPoints([...scripts, 'popup/index.tsx']),
outdir,
})
const glob = new Glob('**')
const globalCssFile = Bun.file(``${publicFolder}/global.css``)
if (!globalCssFile.exists()) throw new Error('global.css not found')
for await (const filename of glob.scan(publicFolder)) {
const file = Bun.file(``${publicFolder}/${filename}``)
if (!file.exists()) throw new Error(``File ${filename} does not exist``)
if (filename.endsWith(ext.png) || filename.endsWith(ext.css)) continue
if (filename.endsWith(ext.html)) {
const fileFolder = filename.replace(ext.html, '')
await $``mkdir -p ${outdir}/${fileFolder}``
await $``cp ${file.name} ${outdir}/${fileFolder}/index.html``
await $``bun run css -- ${globalCssFile.name} -o ${outdir}/${fileFolder}/global.css``.quiet()
} else {
await $``cp ${file.name} ${outdir}``
}
}
await $``cp -R ${publicFolder}/icons ${outdir}``
코드 자체는 간단하다
기존 빌드파일 싸악 날리고 src의 popup을 가져와서 다 빌드한다.
그리고나서 public에서 모든 파일을 glob으로 떙겨 오고
css는 후처리, html파일은 각각의 역할에 맞는 폴더로 말아서 build폴더로 내보낸다
server.ts
export const channel = 'reload-extension'
export const server = Bun.serve({
fetch(req, server) {
const url = new URL(req.url)
if (url.pathname === '/listen') {
const upgraded = server.upgrade(req)
if (!upgraded) {
return new Response('Upgrade failed', { status: 400 })
}
}
return new Response('Hello, world!')
},
websocket: {
open(ws) {
ws.subscribe(channel)
},
message(_, message) {
server.publish(channel, message)
},
close(ws) {
ws.unsubscribe(channel)
},
},
port: 8080,
})
이 extension의 자동 새로고침을 어떻게 구현하나 궁금했는데 이 파일이 핵심적이다.
간단하게, CHROME_EXTENSION_ID를 인자로 받아와서 파일의 변경이 있으면
소켓을 때려서 서버를 갱신하는 로직이다
처음 보고 매우 싱크빅 했는데 .. 역시 괴물은 많다는 걸 느낀다.
watch
import Bun, { $ } from 'bun'
import { parseArgs } from 'util'
import { watch } from 'fs'
import type { FSWatcher } from 'fs'
import chalk from 'chalk'
import './cwd'
import { server, channel } from './server'
const {
values: { dir },
} = parseArgs({
args: Bun.argv,
strict: true,
allowPositionals: true,
options: {
dir: {
type: 'string',
},
},
})
const directoriesToWatch = dir?.split(',').map((dir) => ``./${dir}``) || []
const runBuild = async () => $``bun run config/build.ts``
await runBuild()
const directories = directoriesToWatch.join(', ')
const defaultWatchMessage = ``Watching ${directories} directories for changes...``
console.log(chalk.bold(defaultWatchMessage))
const watchers: FSWatcher[] = []
for (const directory of directoriesToWatch) {
const watcher = watch(directory, { recursive: true }, async (_, filename) => {
console.log(chalk.bold.yellow.dim(``Changes detected in ${filename}``))
await runBuild()
console.log(chalk.bold.green('✔️ Updated build files'))
server.publish(channel, Bun.env.CHROME_EXTENSION_ID as string)
console.log(chalk.bold(defaultWatchMessage))
})
watchers.push(watcher)
}
process.on('SIGINT', () => {
for (const watcher of watchers) {
watcher.close()
}
process.exit(0)
})
여기도 간단하다. 아까 작성한 server를 통하여 watch를 구현한다.
그냥 파일 읽고 watch에 등록, 파일변경이 감지되면 runBuild를 실행하여 build 폴더를 갱신한다
pack
import Bun, { $ } from 'bun'
import AdmZip from 'adm-zip'
import manifest from '../public/manifest.json'
import './cwd'
await $``bun run ./config/build.ts``
const packName = manifest.name.toLowerCase().replace(/[\s\W]+/g, '-')
const { version } = manifest
const folderToCompress = './build'
const outputArchive = ``./release/${packName}-v${version}.zip``
const zip = new AdmZip()
zip.addLocalFolder(folderToCompress)
zip.writeZip(outputArchive)
console.log(``Folder compressed into ${outputArchive}``)
번외로 그냥 이건 build폴더를 zip파일로 만드는 파일이라 생각하면 된다.
chrom.storage.local
자, 이 개념을 헷갈려하면 안된다. 이 기능은 "크롬의 local storage" 인 것이지 크롬의 "localStorage"가 아니다
무슨 말장난이냐고 ??
그냥 간단하다 말그대로 이름이 같은 것이지 두 스토리지는 다른 스토리지라는 것이다.
구현하다가 매우 화가 날 수도있는데, 크롬 자체의 로컬에서의 스토리지는 맞다.
하지만 우리가 디버그 탭에서 볼 수 있는 local storage의 값이 아니라는 것을 알아야한다.
이거때문에 30분은 날린 듯 하다...
content script 구현
핵심적인 기능만 볼텐데 가장 먼저 필요한건 MutationObserver다
const observeBody = () => {
const body = document.body
if (!body) return
let observer: MutationObserver
const observe = () => {
observer = new MutationObserver(() => {
if (document.getElementById('container')) {
sendDOMData()
observer.disconnect()
setTimeout(observe)
}
})
observer.observe(body, { childList: true, subtree: true })
}
observe()
}
먼저 body에다 냅다 Observer를 건다.
몇몇 페이지들은 html 온로드 완료 때려놓고
JS를 때려서 다시 html을 변경하기때문에 이런식으로 구현하면 JS로도 로드된 DOM을 감지하여 작업을 시작 할 수 있다.
그 다음으로는 Proxy객체의 구현이다
const state = new Proxy(
{
isBookmark: false,
bookmarks: [] as string[],
},
{
set(target, key, value) {
target[key as keyof typeof target] = value
if (key === 'isBookmark') {
toggleWebtoonList()
}
return true
},
},
)
let으로 어떻게 잘 만들어서 상태값을 만들어 쓰면 괜찮긴하지만.
useState와 $변수 선언 등, 각종 라이브러리와 프레임워크에 절여진 나의 뇌는 reactivity한 state가 필요했다
바로 Proxy 때려박아서 getter setter를 가진 객체를 하나 만들어주자
이렇게 하고, DOM파싱 한 값 기준으로 DOM에 새로운 버튼 추가,
그리고 웹툰 리스트를 쫙 긁어서 chrome localstore에 넣는 로직등 추가 하면 끝이다
자세한 내용은 아래의 링크를 따라가면 볼 수 있다.
https://github.com/B-HS/Naver_Webtoon_Bookmarker/blob/main/src/content-script.ts
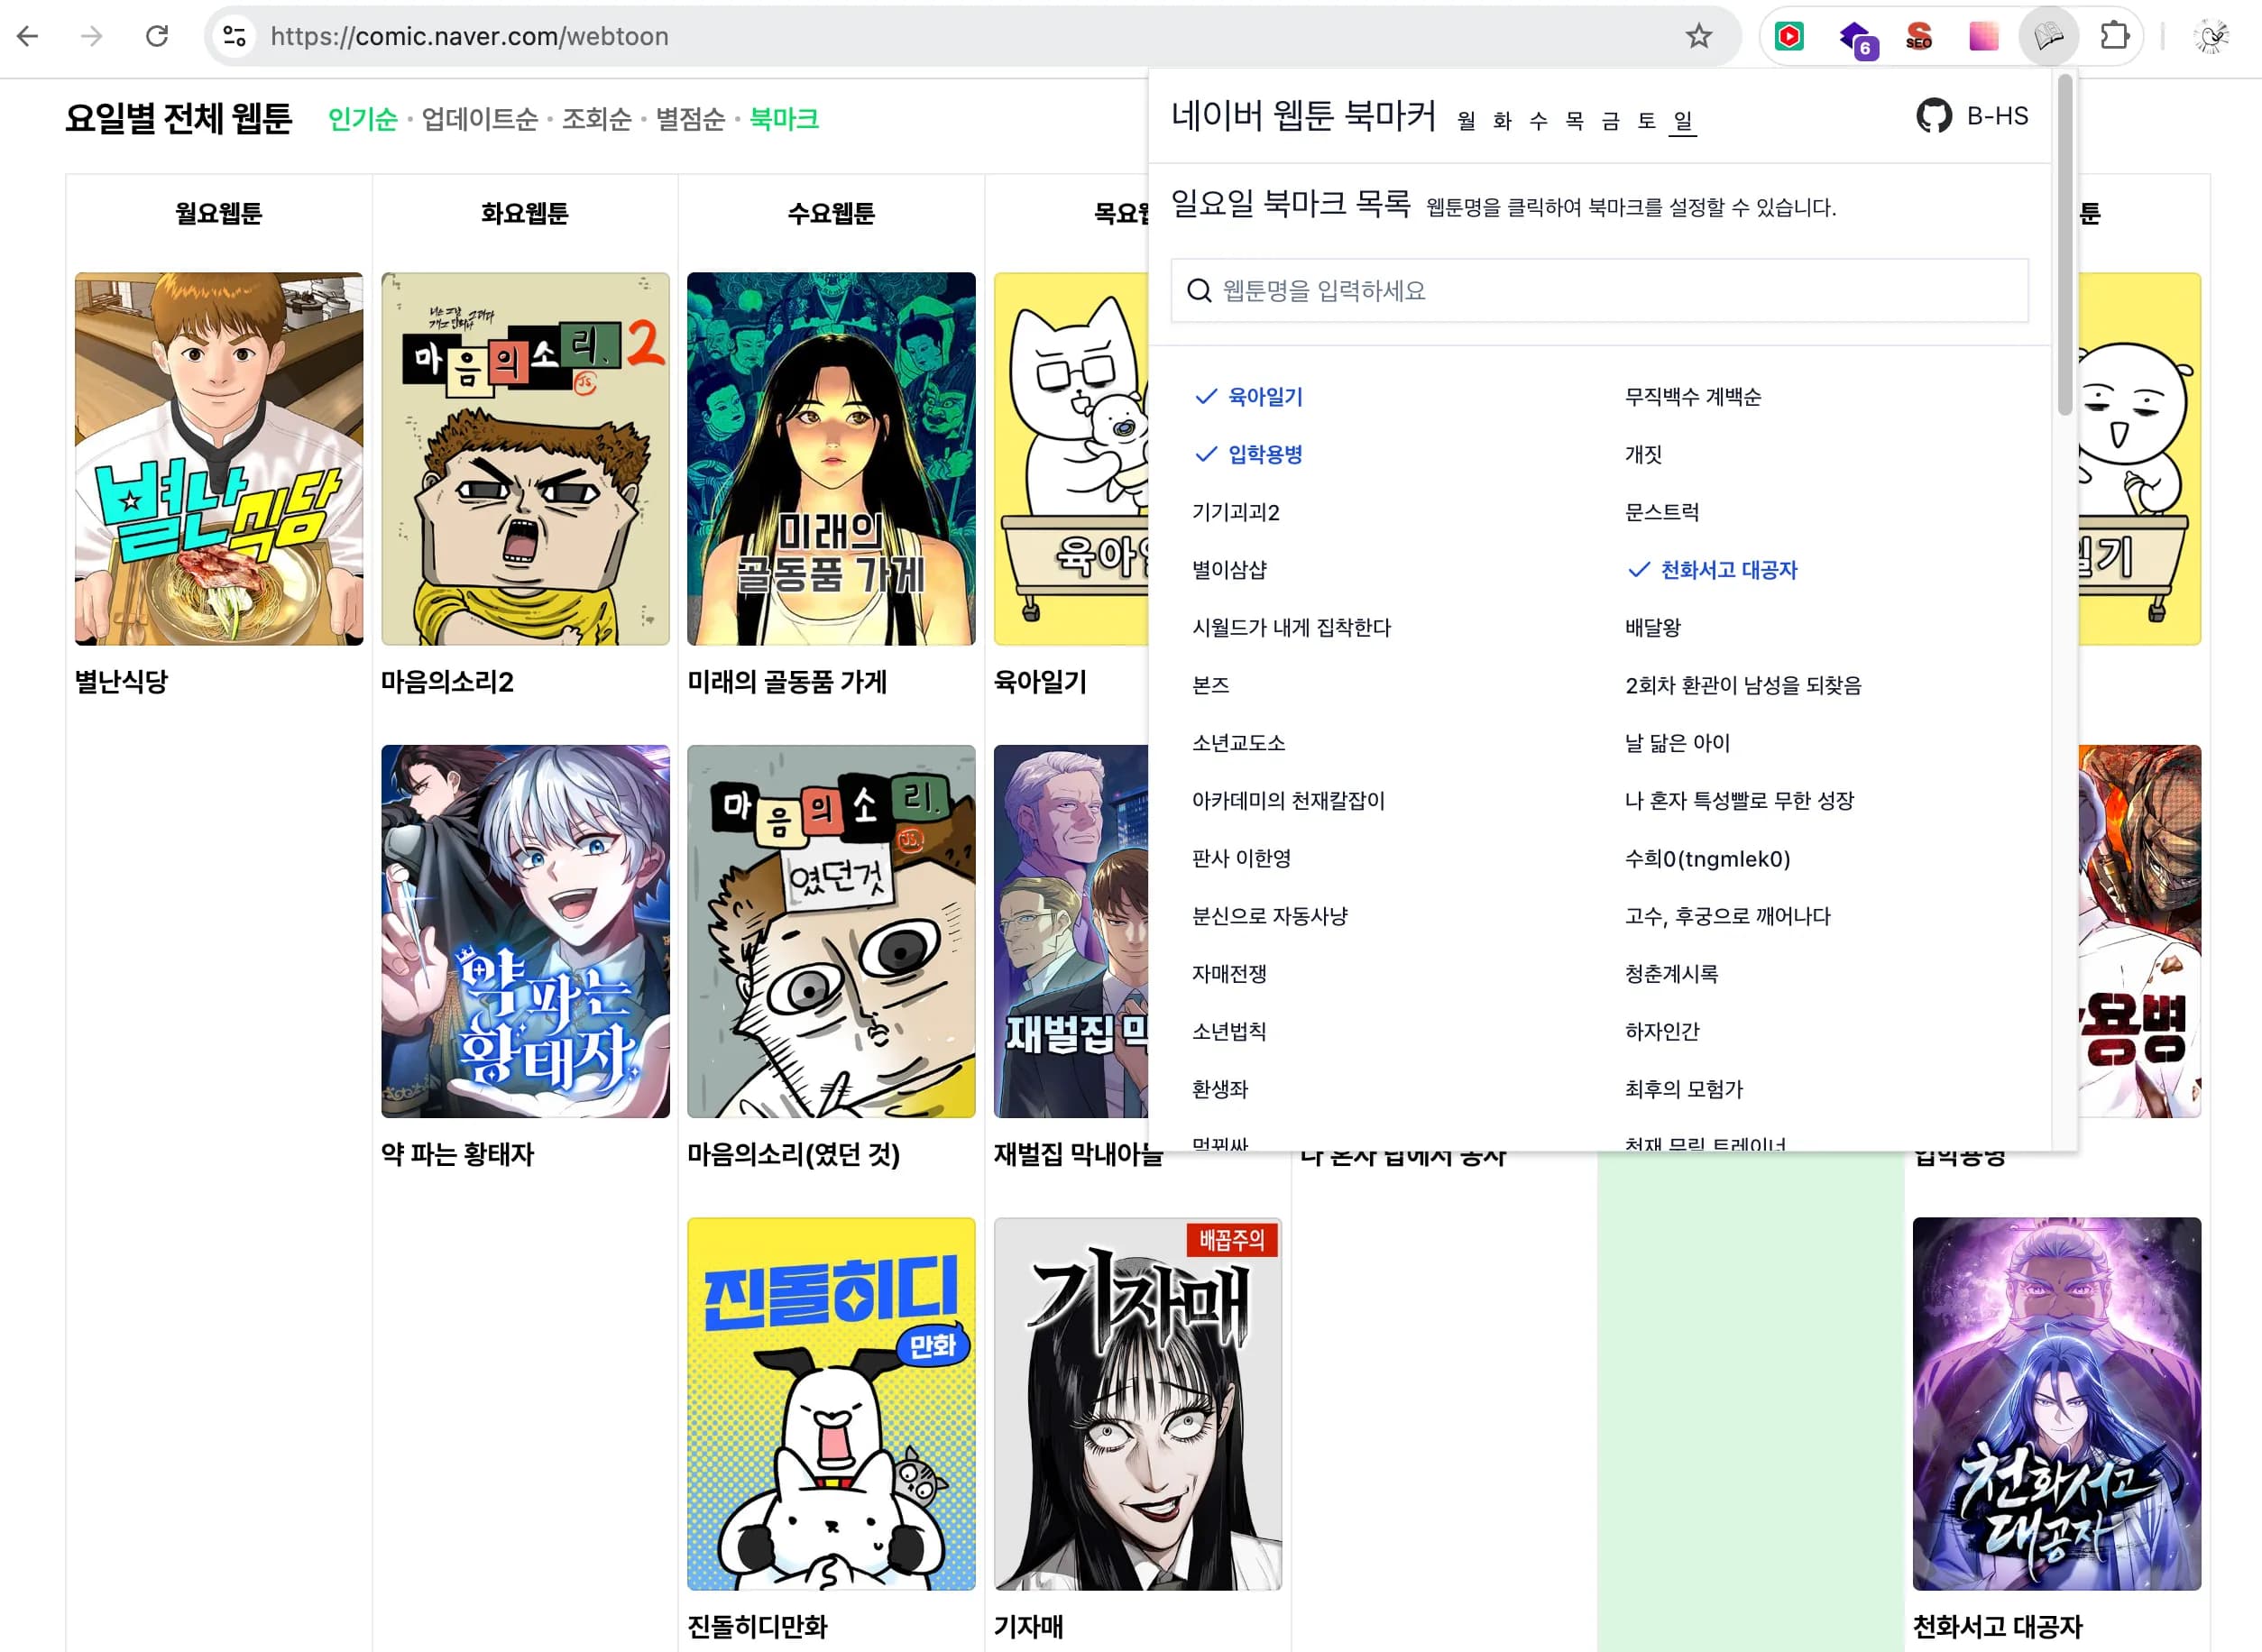
popup
이번에는 shadcn으로 갈아태워서 UI 꾸몄다 굳이 UI 부분을 설명 할 필요가 있을까? 라는 생각이 들어서 링크로 대체한다
https://github.com/B-HS/Naver_Webtoon_Bookmarker/tree/main/src
정확히 widget 의 두 파일과 popup의 popup.tsx를 참고하면 된다.
매우 간단한데, 그냥 간단한 날짜별, keyword별 필터링이 들어간 리스트 페이지라 생각하면 된다.
이후 작업.
나머지는 간단하다. build를 치고 .. 크롬 익스텐션에 새 패키지로 배포하면 작업은 끝이다.
사실 지금 심사 대기중이라서 .. 근데 문제는 심사 대기 치고 또 업데이트 한 사항이 좀 있어서 .. 여러모로 골치가 아프다
여하튼 간단하게 이렇게 익스텐션을 작성(이라하고 업데이트라 한다)해보았다
해피 개발 라이프를 이어가보자.
댓글